Thinking in Composi
Composi is a great tool for creating complex Web apps with JavaScript. It's flexible and versitile, working well with third party libraries and frameworks
Because of its emphasis on components, it forces you to think about the structure of your app as you build it: functional component, class-based component, data flowing down, stateless components or stateful components.
To show how to tackle a project with Composi, we're going to walk through building a spreadsheet from scratch. It's going to be a simple spreadsheet, just so you can see the steps we take to implement it.
Start With A Mockup
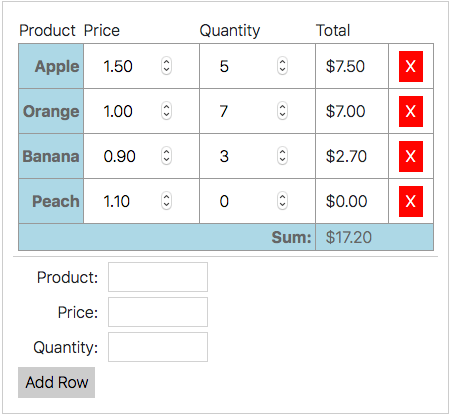
Always start with a mockup of what it is you want to build. It might be a simple sketch on paper, or a Photoshop file from a graphic design. Work with whatever you have at hand. Don't try to create a mockup of every possible feature. Start with the basic. For our spreadsheet, we're keeping it basic. Here's what we want to build:
Identify the Component Hierarchy
With the mockup in hand, you need to look at it and analyze the parts that need to be built. The main part will be the parent component that encompases everything in the mockup. After that, there's a spreadsheet component, and another one to add a new row. The best way to identify the parts is to draw color rectangles around them. Notice how we identify parts in the next image:
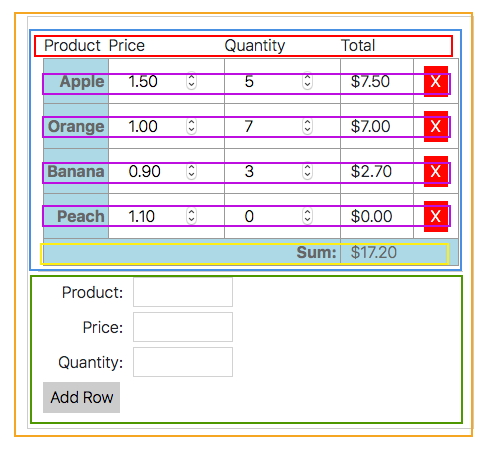
Here's what we see as the the parts based on rectangle colors:
- Orange: the parent component
- Green: a component that adds a new row to the spreadsheet
- Blue: a component that implements spreadsheet functionality
- Red: a component that creates the table header for the spreadsheet
- Violet: a component that creates the individual spreadsheet rows
- Yellow: a component that creates the sum of all the spreadsheet cells of price and quantity
We can clarify the component hierarchy by representing it as a tree:
- SpreadSheetComponent
- SpreadSheet
- TableHeader
- TableRow
- TableFooter
- AddNewRow
- SpreadSheet
Build a Static Version with Composi
The best way to started is to create the main component and have it build the static markup for the entire component. Later, based on the hierarchy we established above, we will break it down in separate sub-components and use composition to assemble them together.
First things first, we need the markup. We'll start with the shell. Since it has two main parts, we'll use an unorder list with two list items. We're going to use a bit of BEM for class and to make the styling easier:
See the Pen Composi Tuts - Thinking in Composi-1 by Robert Biggs (@rbiggs) on CodePen.
The first list item with hold the SpreadSheet component. The second list item will hold AddNewRow. For now, we're going to create the AddNewRow markup, because it's easier:
See the Pen Composi Tuts - Thinking in Composi-2 by Robert Biggs (@rbiggs) on CodePen.
Now let's tackle that spreadsheet. We've got three parts to make: the table header, the table body row and the footer with the sum in it:
See the Pen Composi Tuts - Thinking in Composi-3 by Robert Biggs (@rbiggs) on CodePen.
As you can see, we now have basic structure, but no data. We'll need some mock data for the first render and were going with fruits:
const fruitData = [
  {
    product: 'Apple',
    price: 1.50,
    quantity: 5
  },
  {
    product: 'Orange',
    price: 1.00,
    quantity: 7
  },
  {
    product: 'Banana',
    price: .90,
    quantity: 3
  }, {
    product: 'Peach',
    price: 1.10,
    quantity: 0
  }
]
Creating A Basic Component
Time to make the component. We're first going to implement the render function that creates the previous markup, then we'll add in variables to output our mock data. So, without further ado:
See the Pen Composi Tuts - Thinking in Composi-4 by Robert Biggs (@rbiggs) on CodePen.
This gives us a functioning component rendering a static shell. We need to update it to use the data, fruitData. Also note, that forth column with the header of "Total" needs to show the total for that row. We'll need to do some math when we render the row to print the total for that row. The total will be the item price times the item qunatity. We can access them as we did in their cells. One last thing, because both price and total represent currency, we what to make sure the numerical value always has a decimal followed by two decimal places. We can do that by using .toFixed(2) on the value.
Here's how we output a spreadsheet row for each data row:
// Loop over array of fruits,
// printing each row:
{
  rows.map(row => (
    <tr>
      <td>{row.product}</td>
      <td>
        <!-- Use "toFixed(2)" on price -->
        <input class='price' type='number' min='0' value={row.price.toFixed(2)}/>
      </td>
      <td>
        <input class='quantity' type='number' min='0' value={row.quantity}/>
      </td>
      <td>
        <!-- Multiple quantity x price for total and format with "toFixed(2)" -->
        <span class='total'>${(row.price * row.quantity).toFixed(2)}</span>
      </td>
      <td>
        <button class='list__item__button--delete'>X</button>
      </td>
    </tr>
  ))
}
With this change, our complete component should look like this:
See the Pen Composi Tuts - Thinking in Composi-5 by Robert Biggs (@rbiggs) on CodePen.
Add Total Sum
That footer is missing the total price of all rows. For that we need to add a function and then call it in our footer:
See the Pen Composi Tuts - Thinking in Composi-6 by Robert Biggs (@rbiggs) on CodePen.
This will now ouput the sum of all rows in the footer. Notice that we also added a $ right before the sum.
Add New Row
Next let's make it so the user can add a new item. We need to be able to capture the item name, as well as its price and quantity. We'll need to provide a defalt value of 0 in case the user doesn't bother providing a price or quantity. When we add the new item, we want the spreadsheet to show it. We also want the sum to reflex the new row's values. That means we need to add the new item to the spreadsheet's state.
Adding a new item will require a user interaction. For that we will need an event on the button to submit the new values. We'll use the handleEvent interface and the componentDidMount hook to set that up. We'll call the new method, addNewRow:
addNewRow(e) {
  // Get the value of the inputs:
  const productInput = this.element.querySelector('#product')
  const priceInput = this.element.querySelector('#price')
  const quantityInput = this.element.querySelector('#quantity')
  const product = productInput.value
  // Set default values for price and quantity:
  const price = Number(priceInput.value) || 0
  const quantity = Number(quantityInput.value) || 0
  // Set inputs back to empty:
  productInput.value = ''
  priceInput.value = ''
  quantityInput.value = ''
  // Check if user entered a product name:
  if (product) {
    // Update component state with new product:
    this.setState(prevState => prevState.push({product, price, quantity}))
  } else {
    // User hit Add button without entering product:
    alert('Please provide a product name before trying to add a row.')
  }
}
// And set up an event to capture button click:
componentDidMount() {
  this.element.addEventListener('click', this)
}
With this addition, we get:
See the Pen Composi Tuts - Thinking in Composi-7 by Robert Biggs (@rbiggs) on CodePen.
Updating Price and Quantity
Next we want to be able to update the price or quantity of a row item. Since those are input tags, we'll also need to add another event listener for type input in our componentDidMount hook. We'll also need two more methods: updatePrice and updateQuantity.
In order to make the rows editable, we need a way to associate each row with the corresponding index of the state array. We can do that by printing the array index on the interactive elements. We'll use the data-index attribute on those elements. Here's our updated code for the table cells. Notice the new attribute data-index on the price input, quantity input and button:
{
  rows.map(row => (
    <tr>
      <td>{row.product}</td>
      <td>
        <!-- Use "toFixed(2)" on price -->
        <input class='price' data-index={idx} type='number' min='0' value={row.price.toFixed(2)}/>
      </td>
      <td>
        <input class='quantity' data-index={idx} type='number' min='0' value={row.quantity}/>
      </td>
      <td>
        <!-- Multiple quantity x price for total and format with "toFixed(2)" -->
        <span class='total'>${(row.price * row.quantity).toFixed(2)}</span>
      </td>
      <td>
        <button data-index={idx} class='list__item__button--delete'>X</button>
      </td>
    </tr>
  ))
}
Now we can procede with adding the new methods to update price and quantity to our component:
updateQuantity(e) {
  // Get the array index stored on the input.
  // With that we can update the state.
  const index = e.target.dataset.index
  const value = Number(e.target.value)
  this.setState(prevState => prevState[index].quantity = value)
}

updatePrice(e) {
  // Get the array index stored on the input.
  // With that we can update the state.
  const index = e.target.dataset.index
  const value = Number(e.target.value)
  this.setState(prevState => prevState[index].price = value)
}
Then we need to update the componentDidMount hook and the handleUpdate method:
handleEvent(e) {
  e.target.id === 'addRow' && this.addNewRow(e)
  e.target.class === 'list__item__button--delete' && this.deleteRow(e)
  e.target.class === 'quantity' && this.updateQuantity(e)
  e.target.class === 'price' && this.updatePrice(e)
}

componentDidMount() {
  this.element.addEventListener('click', this)
  this.element.addEventListener('input', this)
}
With these changes, we can now increase or decrease the price or quantity and see the row total and the spreadsheet sum update in real time. Here's what we have now:
See the Pen Composi Tuts - Thinking in Composi-8 by Robert Biggs (@rbiggs) on CodePen.
Deleting a Row
Each row has a delete button. This is so you can delete a row if you want. When this happens, the component state should update, showing the row is missing. Tapping the delete button should not delete the element from the DOM, like you would with jQuery. Instead it needs to remove the associated data from the component state. That in itself will cause the component to re-render without the deleted data.
When the user clicks the delete button, we need to know what index in the state array should be deleted. Earlier we had the same problem with know what index to update when modifying price and quantity. We used the data-index property to store the array index. When we did that, we also put that property on the row's delete button. So, we can now use that to now which index to delete. We will therefore add a new method to our button to handle deletion:
deleteRow(e) {
  const index = e.target.dataset.index
  this.setState(prevState => prevState.splice(index, 1))
}
We also need to update the handleEvent method:
handleEvent(e) {
  e.target.id === 'addRow' && this.addNewRow(e)
  e.target.class === 'list__item__button--delete' && this.deleteRow(e)
  e.target.class === 'quantity' && this.updateQuantity(e)
  e.target.class === 'price' && this.updatePrice(e)
}
With this our spreadsheet is complete. The spreadsheet will render its default data, we can add new items to it, we can update an item's price or quantity and the total and sum will update as well. And we can delete a row from the spreadsheet, causing the total and sum to update:
See the Pen Composi Tuts - Thinking in Composi-9 by Robert Biggs (@rbiggs) on CodePen.
Breaking It Down
Now we can begin breaking the component down into smaller pieces. We'll start with the easy parts, the table header and the Add Row form. Since they are simple, we'll make them function components that we can use in our component as custom tags:
function TableHeader() {
  return (
    <tr>
      <th>Product</th>
      <th>Price</th>
      <th>Quantity</th>
      <th>Total</th>
      <th></th>
    </tr>
  )
}

function AddNewRow() {
  return (
    <li class='list--spreadsheet__item'>
      <div id='newRowForm'>
        <p>
          <label for="product">Product: </label>
          <input name='product' id='product' type="text" tabindex='1' />
        </p>
        <p>
          <label for="price">Price: </label>
          <input name='price' id='price' type="text" tabindex='2' />
        </p>
        <p>
          <label for="quantity">Quantity: </label>
          <input name='quantity' id='quantity' type="text" tabindex='3' />
        </p>
        <p>
          <button id='addRow'>Add Row</button>
        </p>
      </div>
    </li>
  )
}
We can now use these in our spreadsheet component:
See the Pen Composi Tuts - Thinking in Composi-10 by Robert Biggs (@rbiggs) on CodePen.
Hopefully you can see where we are going with this. Rather then step through the rest, we'll just show you the final solution, finely broken down into subcomponents. This implemented the principles of composition and props for data flowing down. The subcomponents are dumb in that they do not know about their parent. They do not even know if their parent is stateful or stateless. The get their data passed down through props. Here's the complete component with functional components getting props passed down:
See the Pen Composi Tuts - Thinking in Composi-11 by Robert Biggs (@rbiggs) on CodePen.
Tip
After the first stage of creating a component, start breaking out subcomponents with the simplest parts first. When a subcomponent is still complex, break it into smaller parts gradually, one piece at at time, not all at once. That way if there is an error, it will be easier for you to find the cause.
Inheritance vs Composition
Composi offers a powerful class-based Component for building interfaces. You use it by extending it. This is classical inheritance, common in all object oriented programming languages. The principle is that you start with a base object and extend it to add new properties and methods. In face the browser's DOM works this way. At the same time, Composi encourages the use of composition to make complex component's more manageable. Extending the Component class one level is fine. Taking that extension and extending it again to add more featues is not a good strategy. Instead, look at how composition can help you make the complex hierarchies you need.